Jamma Nation X S-video Mod for Neo Geo AES
How to Install the Jamma Nation X S-Video Kit
In this guide you will learn how to install the S-video kit purchased from the Jamma Nation X store. If you bought the parts yourself just follow along.
We will be using the internal CXA1145 Sony Encoder.
Tools Needed:
Phillips Head Screwdriver
Wire Cutters
Soldering Iron
Solder
1 Panel/Chassis Mount S-video Jack
1 Red Panel/Chassis Mount Phono Jack
1 White Panel/Chassis Mount Phono Jack
1 NTE85 Transistor (Or similar)
1 27ohm 1/4 watt Resistor
1 75ohm 1/4 watt Resistor
1 220uf Electrolytic Capacitor
Some Ribbon Cable or 28-30awg wire
Unibit (For Making Jack Holes)
Hot Glue Gun (Optional)
Building the Part Assemblies
You will need to build an amp for the Luma signal. Below is a picture of a NTE85 transistor.

Now take the 2 outer legs of the NTE85 and bend them out like so.

Now bend the 2 legs like so to make loops for easier soldering.

This is the 27ohm resistor.

Snip the ends to about this length.

Now bend the ends to form loops like you did with the NTE85.

Next join the 27ohm resistor to the LEFT leg of the NTE85.

Next solder them together and set aside for use later.

This is the 220uf capacitor.

Next snip the legs to have about just over a 1/4". Now bend the POSITIVE leg like so.
On the capacitor you can see a white line on the body, this indicates the NEGATIVE leg.

Next make a loop with the positive leg.

This is the 75ohm resistor.

Just like the 27ohm resistor snip the ends and make loops.

Next join the 75ohm resistor and the 220uf capacitor like so.

Next solder them together.

Right now you should have exactly what is in the picture below. The 220uf cap assemby will connect to the Chroma Pin
and the NTE85 assembly will connect to the Luma Pin on the encoder.

This is the internal Sony encoder in your AES. We will be tapping a few spots on the board.
We will be using pins 15 and 16 on the encoder and 2 other points from another chip for your +5v and ground sources.

Now attach a 6" piece of wire to the right leg of the NTE85.

Now connect the middle leg of the NTE85 to the last pin on the LS273 IC near the AV port. This pin supplys +5v for the NTE85.

In this picture is the Sony CXA1145 encoder in the AES. The pink dot represents where you will be soldering the negative leg on the 220uf cap assembly.
This pin #15 is the Chroma output pin. It's a little tight fit. It's easier if you apply solder to the pins first.

In this picture you can see the 220uf cap mounted.

Now connect the piece of wire from the NTE85 to Pin 16 on the encoder, the blue dot.

Now solder a wire from the output of the Chroma and one from the Luma like in the picture below. These 2 signals will go to the s-video jack.

If you plan to use the Composite video jack as well you can get Composite video from Pin 3 on the AV socket.
The smaller dot is the preferred place to get it from but you may also get it from the bigger spot which is Composite output from the AV socket.

To get the stereo signals you will need to flip the AES board over. We will be getting the audio from the headphone connector.
In this picture is the underside of the headphone jack. Solder a wire to each pad (3). Make sure the length of the wires are about 3" longer than the board. Once you solder the wires run them straight to the back of the AES board.

First you will need to plot out how your jacks will be along the back of the unit. For myself I like to go with 1" spacing between the jacks. First you will need 1" blue painters tape about 7" in length. Using a ruler make a line down the center along the 1/2" mark. Then on the line mark where the first jack will go, you will need to make 4 marks spaced 1" apart from each other.

Once you mark the 4 spots, line up the bottom edge of the tape with the bottom edge of the casing of the AES, this will keep the jacks in a straight line. I usually set the first mark on the right about 2" from the notch for the AV jack. Once everything looks good make sure you look on the other side of the casing to see if any marks are in the same place as any ribs. If they are you will need to trim the rib in the system. If you drill the hole without cutting the rib the drill bit will move to one side of the rib making the hole uncentered.

Next, drill some pilot holes with a small drill bit. I use 1/16" for my pilot holes, 1/8" works as well. Just remember that if you use a bit bigger than 1/8" it starts to drift when making a pilot hole. After you make your pilot holes, use your Unibit to make the holes big enough to fit the jacks through. I usually use my unibit with the a screwdriver instead of a drill so I have complete control of the depth and speed.

Below is the pinout for the s-video jack. The 2 ground pins can be connected together then connected to ground. I usually use a piece of a resistor leg to connect the 2 pins together. Above the 2 ground pins you will see 2 other pins that are closer together. Chroma goes to the left pin and Luma to the right pin.
For Composite it goes to the yellow jack and goes to the center pin. The outside tab is for ground.
For the audio jacks use the 3 wires from the headphone connector, ground, left(white) and right(red). I use a different ground point for audio and video. I notice when I use the same ground point I get noise on the screen.

This is how it should look when you are finished.

If you have any questions please contact me
Neo Geo S-Video Screen Shots
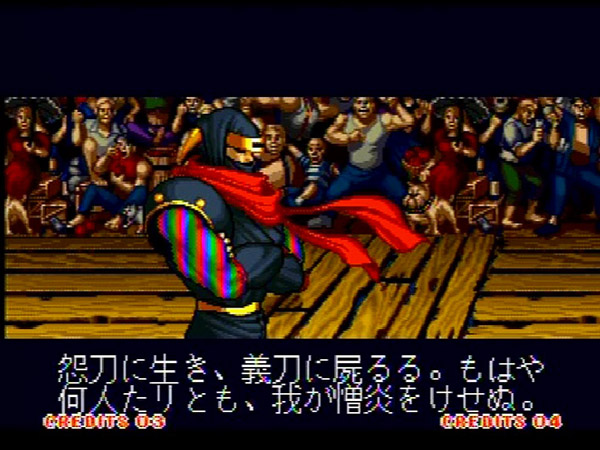
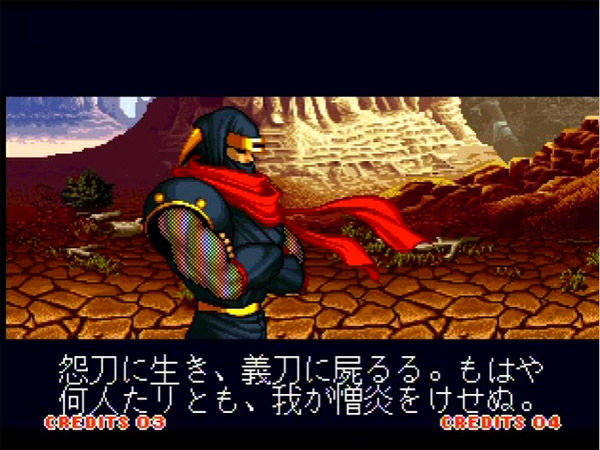
Here are some screenshots from a Neo Geo AES with this S-video circuit. Sony Reccomends a 470uf cap, the pics are with a 220uf cap:
Composite Video
S-Video
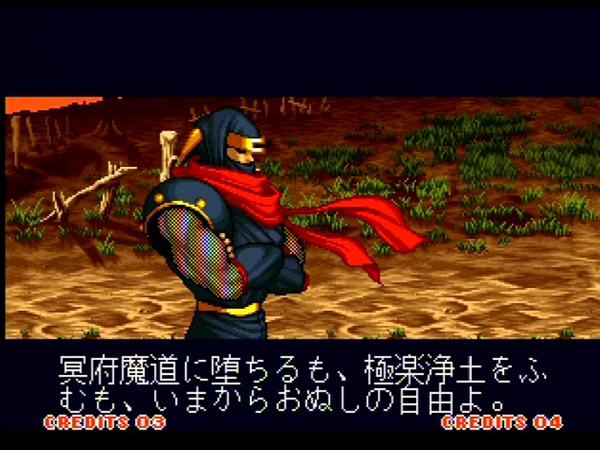
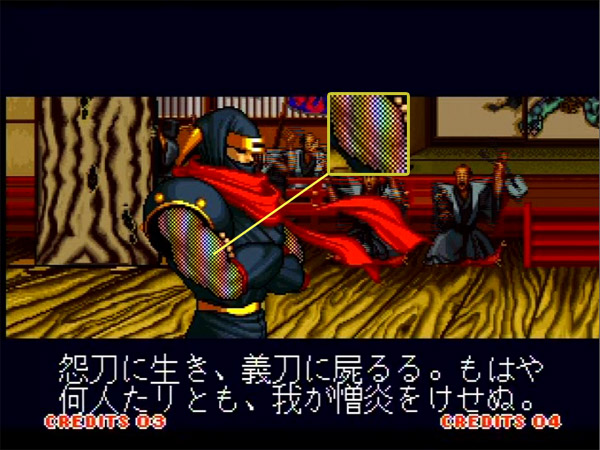
For those that are thinking of trying other values of capacitors, don't. It doesn't make a difference. There will still be noise in the signal which is very evident in the sleeves of Hanzo. The only thing that will get rid of the noise is Component video or RGB. Here are some other examples:
S-Video w/220uf Cap

S-Video w/470uf Cap
S-Video w/470uf Cap with 0.1uf Coupling Cap
Xian Xi